简 述: 讲解 dot 绘图语言的简要使用(graphviz 工具包),转载于 dot 绘图语言 一文(已沟通,获得转载许可)。
[TOC]
dot 绘图语言
graphviz 是一个很古老的开源软件包了,用来绘制结构化的图形。
通过它,你只需要编写简单的脚本(dot 语言),描述图的逻辑和关系, 它就能够自动帮你搞定布局之类的琐碎事情,生成你需要的图。
在编程当中,其实很多时候并不太在乎图的美观和布局,往往我们需要的是一种直观的图形方式来表达我们内在的复杂逻辑。 这时,graphviz 的威力就发挥出来了。只需要使用 dot 脚本简单描述下逻辑,就能很好的得到需要的直观图形。
这篇博文总结了下 dot 的常用语法和几个示例以让我更好的使用 dot。 我本人喜欢在 org-mode 中使用 org-babel 插入所需要的图,关于这方面的配置留到下篇博文再讲。😀
首先上一个很厉害也很实用的示例,有人用 dot 轻松的绘制出了离散数学的思维导图: https://zhuanlan.zhihu.com/p/20450190
1. 有向图和无向图
digraph G{
a -> b;
}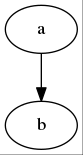
使用 digraph 定义有向图。上面的代码定义了有向图 G。 有向图中,使用 -> 符号表示边。上面的代码中,从节点 a 指向节点 b 有一条边。
graph G{
a -- b;
}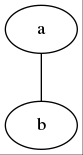
使用 graph 定义无向图。上面的代码定义了无向图 G。 无向图中,使用 – 符号表示边。上面的代码中,节点 a 和节点 b 之间有一条边。
2. 边和节点
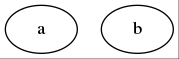
如下定义了节点 a 和 b:
digraph G{
a;
b;
}
如下定义了节点 a 到 b 的边:
digraph G{
a -> b;
}
可以看到,在定义边的时候需要说明节点。如果这些节点之前没有定义过,在这里也会被定义。
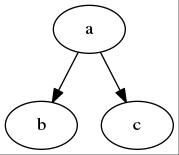
如果一个节点到多个节点都有边,还有一种简写法:
digraph G{
a -> {b c};
}
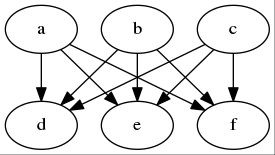
甚至,多个节点到多个节点都有边:
digraph G{
{a b c} -> {d e f};
}
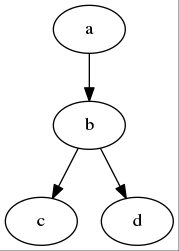
连着写也是可以的:
digraph G{
a -> b -> {c d};
}
实际上,末尾的分号是可写可不写的。而且无论你写不写分号,换不换行都不影响语义。 这个看个人习惯,dot 的语法并没有强制规定这个。
3. 设置属性
3.1. 对单个节点或边设置属性
在边或节点的后面加上一对方括号,里面使用 key=value 的形式设置它的属性。
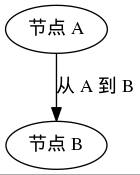
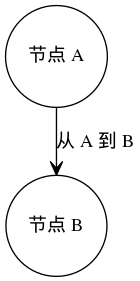
边和节点都有个 label 属性,表示它实际显示的文字。默认情况下,边是不显示文字的,节点的文字就是节点的名称。 下面给节点和边手动设置 label 属性:
digraph G{
  a [label="节点 A"];
  b [label="节点 B"];
  a -> b [label="从 A 到 B"];
}
节点的 shape 属性表示节点的形状,边的 arrowhead 表示箭头的形状:
digraph G{
  a [label="节点 A", shape=circle];
  b [label="节点 B", shape=doublecircle];
  a -> b [label="从 A 到 B", arrowhead=vee];
}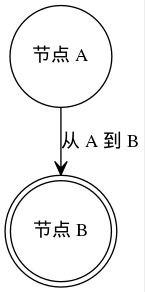
可以看到,要设置这个边或这个节点的多个属性,之间用逗号隔开。
更多关于边和节点的形状,参考这里: 节点的形状:http://graphviz.org/content/node-shapes 边的形状:http://graphviz.org/content/arrow-shapes
3.2. 对所有的节点或边设置属性
如果你想一次设置对多个节点生效,这样:
digraph G{
node[shape=circle];
edge[arrowhead=vee];
  a [label="节点 A"];
  b [label="节点 B"];
  a -> b [label="从 A 到 B"];
}
在 node 后接中括号,里面写上属性设置,接下来定义的所有节点会默认使用这里的属性设置。
对多个边设置属性也类似节点。在 edge 后接中括号设置属性。
3.3. 设置图的属性
图本身也能设置一些属性,比如布局方式,图本身的说明标签:
digraph G{
rankdir = LR;
label = "示例图";
a -> b;
}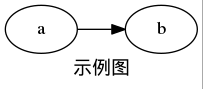
rankdir 设置了图的布局为 LR,即从左向右;默认图的布局是 TB,即从上向下。 label 设置了对图本身的说明标签。
3.4. 常用属性
这篇文章里对常用的图,边和节点的属性做了一个较好的总结: http://www.jianshu.com/p/5b02445eca1d
4. 注释
dot 支持 C 和 C++风格的注释,//和/* */两种。
5. 复杂的节点结构
通过对 label 进行一定格式的编写,就能够在 label 中呈现出如下这样的结构:
digraph structs {
    node [shape=record];
    struct1 [shape=record,label="<f0> left|<f1> mid\ dle|<f2> right"];
    struct2 [shape=record,label="<f0> one|<f1> two"];
    struct3 [shape=record,label="hello\nworld |{ b |{c|<here> d|e}| f}| g | h"];
    struct1 -> struct2;
    struct1 -> struct3;
}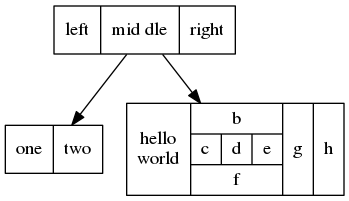
注意到节点被分成了几个小方框,而且每一个方框都可以指定一个名称。
在连接节点时,通过这个名称就能更细的指定具体连接到哪一个小方框上:
digraph structs {
node [shape=record];
struct1 [shape=record,label="<f0> left|<f1> middle|<f2> right"];
struct2 [shape=record,label="<f0> one|<f1> two"];
struct3 [shape=record,label="hello\nworld |{ b |{c|<here> d|e}| f}| g | h"];
struct1:f1 -> struct2:f0;
struct1:f2 -> struct3:here;
}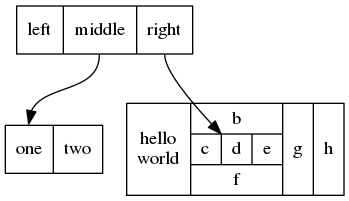
使用这个特点,能够使用 dot 很方便的画出数据结构的图。
6. 子图
通过子图,可以对边和节点进行分组。
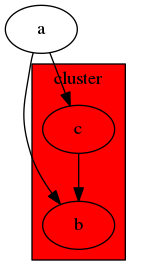
如果子图名以 cluster 开头,这个子图会用一个方框框起来。 而且 cluster 会被当成一个新的布局来处理。 你还可以对 cluster 设置某些属性,比如背景色,标签之类的。
digraph graphname
{
  a -> {b c};
  c -> b;
  subgraph cluster_bc
  {
    bgcolor=red;
    label="cluster";
    b;
    c;
  }
}
7. 几个示例
通过下面几个示例可以看到,用 dot 绘制标准化的图形,很简单直观。
悄悄的说一句,这些图,是我从官方的《dotguide》里面剽窃来的,嘘。。。
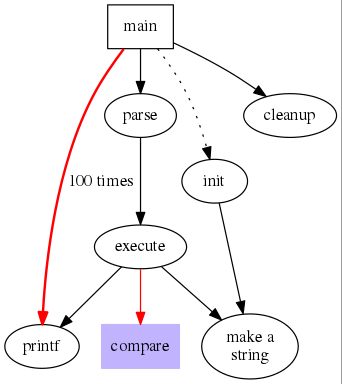
7.1. 函数调用图
digraph G {
size ="4,4";
main [shape=box]; /* this is a comment */
main -> parse [weight=8];
parse -> execute;
main -> init [style=dotted];
main -> cleanup;
execute -> { make_string; printf}
init -> make_string;
edge [color=red]; // so is this
main -> printf [style=bold,label="100 times"];
make_string [label="make a\nstring"];
node [shape=box,style=filled,color=".7 .3 1.0"];
execute -> compare;
}
7.2. 数据结构二叉树
digraph g {
node [shape = record,height=.1];
node0[label ="<f0> |<f1> G|<f2>"];
node1[label ="<f0> |<f1> E|<f2>"];
node2[label ="<f0> |<f1> B|<f2>"];
node3[label ="<f0> |<f1> F|<f2>"];
node4[label ="<f0> |<f1> R|<f2>"];
node5[label ="<f0> |<f1> H|<f2>"];
node6[label ="<f0> |<f1> Y|<f2>"];
node7[label ="<f0> |<f1> A|<f2>"];
node8[label ="<f0> |<f1> C|<f2>"];
"node0":f2 ->"node4":f1;
"node0":f0 ->"node1":f1;
"node1":f0 ->"node2":f1;
"node1":f2 ->"node3":f1;
"node2":f2 ->"node8":f1;
"node2":f0 ->"node7":f1;
"node4":f2 ->"node6":f1;
"node4":f0 ->"node5":f1;
}
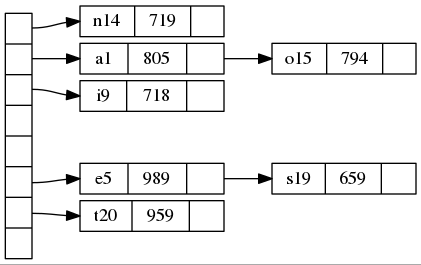
7.3. 数据结构 hash 表
digraph G {
  nodesep=.05;
  rankdir=LR;
  node [shape=record,width=.1,height=.1];

  node0 [label = "<f0> |<f1> |<f2> |<f3> |<f4> |<f5> |<f6> | ",height=2.5];
  node [width = 1.5];
  node1 [label = "{<n> n14 | 719 |<p> }"];
  node2 [label = "{<n> a1  | 805 |<p> }"];
   node3 [label = "{<n> i9  | 718 |<p> }"];
   node4 [label = "{<n> e5  | 989 |<p> }"];
   node5 [label = "{<n> t20 | 959 |<p> }"] ;
   node6 [label = "{<n> o15 | 794 |<p> }"] ;
   node7 [label = "{<n> s19 | 659 |<p> }"] ;

   node0:f0 -> node1:n;
   node0:f1 -> node2:n;
   node0:f2 -> node3:n;
   node0:f5 -> node4:n;
   node0:f6 -> node5:n;
   node2:p -> node6:n;
   node4:p -> node7:n;
}
8. 最后及其它资料
可以看到,dot 这种语言语法简单,稍微学习就能编辑简单的脚本来描述复杂的图形。 对于这种方式生成图形,初始用时可能有些不习惯,毕竟使用这种“写代码”的方式来生成图形是很反直觉的。
但是熟悉之后就会发现,使用 dot 在画某些图形,特别是思维导图类时, dot 能帮助我们从烦琐的布局中解脱出来,让我们的思绪和注意力集中在真正的逻辑上。 专心思考一件事情时,任何一个分心点,都有可能让思维大打折扣。
在学习使用 dot 的过程中参考了以下资料,特此感谢:


